Skip to content
Support center
  • Home
  • Support Center
  • Docs
  • Changelog

General

  • Support
  • Plugin Bundled with Themes
  • How to Revoke Product License Key
  • How to purchase ElementsKit and Metform Pro License

Elements Kit

  • Widget Builder
  • Header Footer Builder
  • Mega Menu Builder
  • Vertical Mega Menu
  • One Page Scroll
  • Parallax Effects
  • Sticky Content Module
  • Instagram Feed API
  • Facebook Feed API
  • Facebook Messenger
  • Twitter Feed API
  • Advanced Accordion
  • Advanced Tab
  • Timeline
  • Advanced Chart
  • Data Table
  • Creative Button
  • Motion Text
  • Hotspot
  • Gallery
  • Woocommerce Product List
  • Woocommerce Category List
  • Woocommerce Mini Cart
  • Woocommerce Product Carousel
  • Heading Title
  • Button
  • Team
  • Accordion
  • Tab
  • Social Media
  • Client Logo
  • Mailchimp
  • FAQ
  • Image
  • FunFact
  • Countdown Timer
  • Image Box
  • Image Accordion
  • Icon Box
  • Pie-Chart
  • Progress Bar
  • Pricing Table
  • Testimonial
  • Header Info
  • Video
  • Image Comparison
  • Post Tab
  • Post List
  • Page List
  • Header Off-canvas
  • Dropcaps
  • Duel Button
  • Business Hours
  • Social Share
  • Category List
  • Search
  • Post Grid
  • Nav Menu
  • Contact Form 7
  • Caldera Form
  • We Forms
  • Wp Forms
  • Ninja Forms
  • Tablepress
  • Unfold
  • Advanced Toggle

MetForm

  • Getting Started
  • Form Input Field
  • Pro Input Field List
  • Pro Feature- Multi-Step Form
  • Pro Feature- Calculation
  • Pro Feature- Payment Method
  • Pro Feature- Conditional Logic
  • General
  • Confirmation
  • Notification Email
  • Integration
  • Payment
  • CRM
  • Auth
  • reCAPTCHA Integration
  • PayPal Payment Set Up
  • Stripe Payment Set Up
  • Thank You Page
  • Mailchimp Integration
  • AWeber Integration
  • ActiveCampaign
  • GetResponse Integration
  • ConvertKit Integration
  • Hubspot
  • Zoho
  • MailPoet Integration
  • Slack Integration
  • Support
  • WooCommerce Checkout
  • Create Post with MetForm
  • Response Message

WP Social

  • GETTING STARTED WITH WP SOCIAL
  • WP SOCIAL FACEBOOK LOGIN
  • WP SOCIAL GOOGLE LOGIN APP
  • WP SOCIAL LINKEDIN LOGIN APP
  • WP SOCIAL TWITTER APP
  • WP SOCIAL WORDPRESS APP
  • WP SOCIAL GITHUB APP
  • WP SOCIAL REDDIT APP
  • WP SOCIAL DRIBBBLE APP
  • WP SOCIAL COMMENT COUNT
  • WP SOCIAL POST COUNT

WP Ultimate Review

  • Settings

WP Fundraising Donation

  • Getting Started with WP Fundraising
  • WP Fundraising With Crowdfunding
  • WP fundraising with Single Donation Campaign
  • Others Way to Add Campaign
  • WP Fundraising With Default Payments
  • WP Fundraising with Woocommerce
  • Short-Code
  • Do-Action
  • Home
  • Docs
  • MetForm
  • Notification Email

Notification Email

Table of Contents
  • Set Up Notification Email
    • How to Create Form
    • Form Setting
    • Notification Email

Set Up Notification Email #

  • To Set Up Notification Emails, first Create a Form

How to Create Form #

Follow the Video Screen-cast:

Follow the Step By Step Process

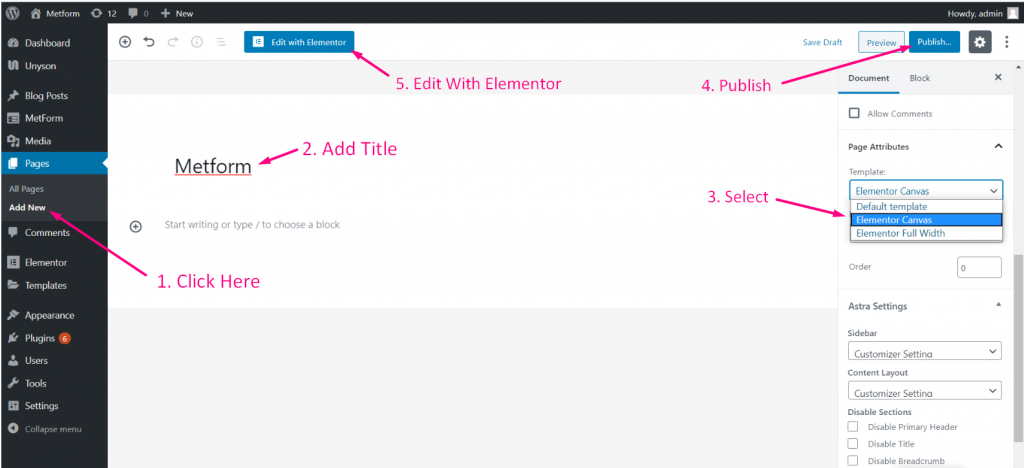
Step=>1: Go to Dashboard=> Pages=> Add new=>

  • Add Page Title
  • Select Template Elementor Canvas
  • Click on Publish
  • Edit with Elementor
  • Step=>2: Search For Metform=> Drag and Drop
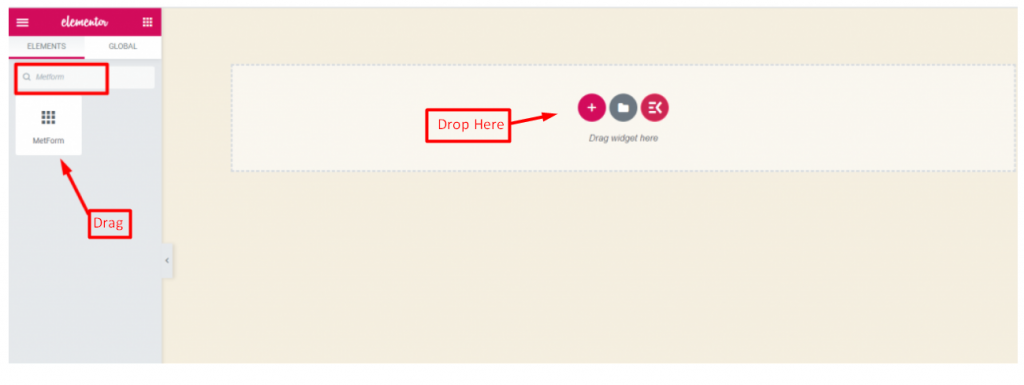
  • Step=>3: Click on the selected Icon
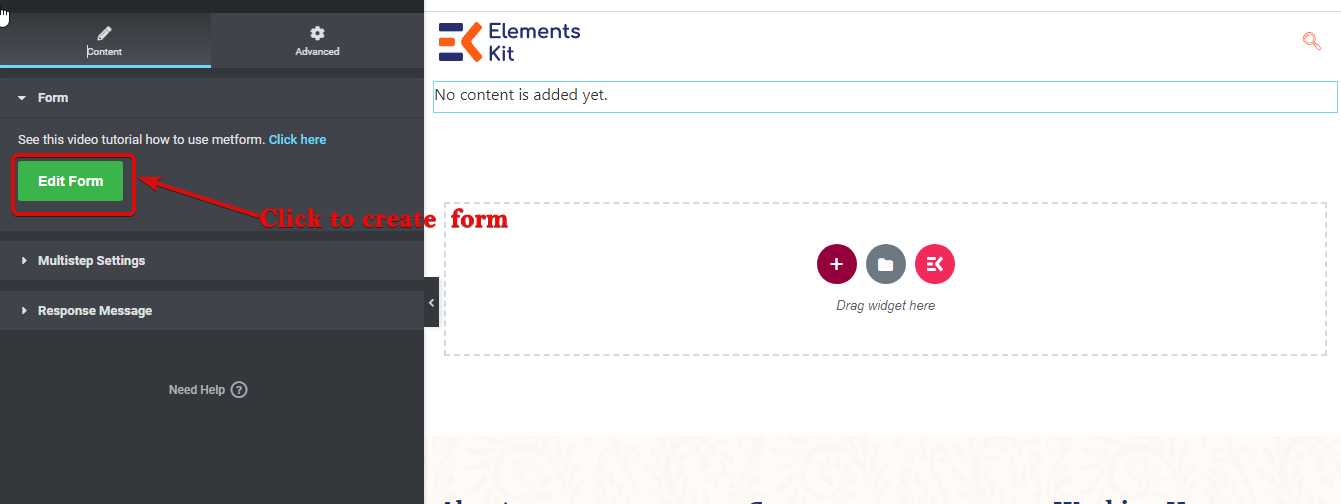
  • Step=>4: Select form option from previously created form
  • Or you can select New=> Enter your Form Name=> Click on Edit Form
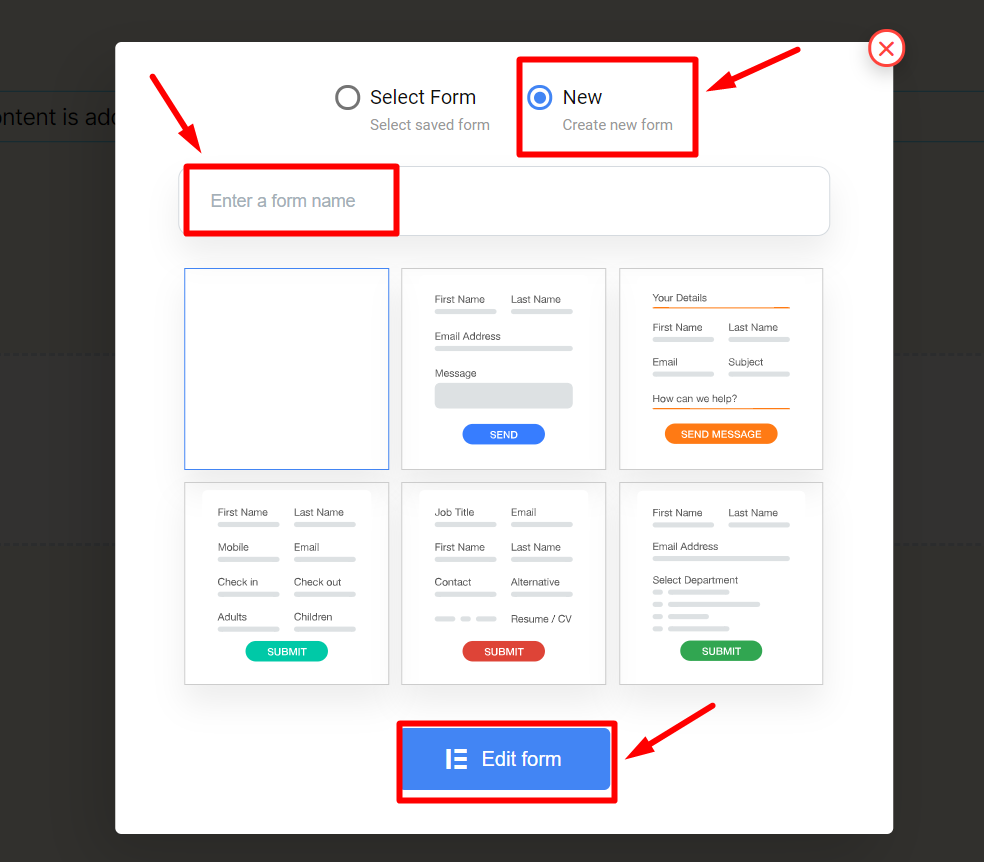
  • The Created Form will Appear=> Click on Form Setting
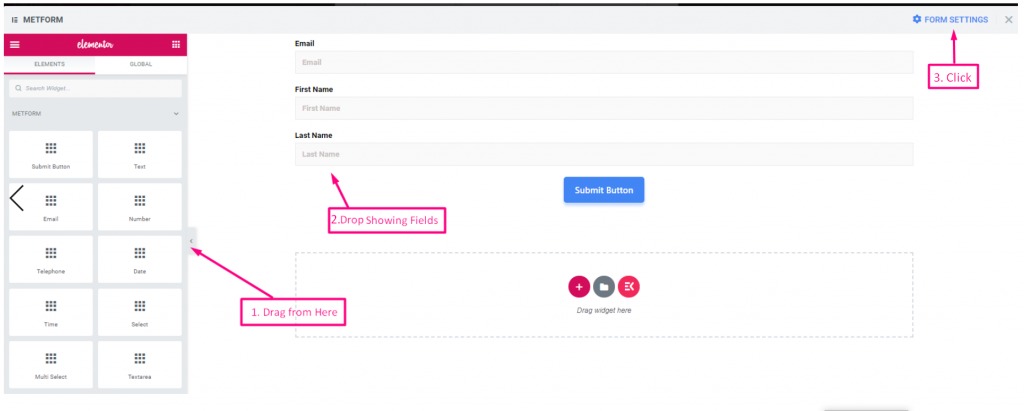
Form Setting #

Go to Form Setting=> Notification Email

Notification Email #

You can send a submission copy to admin by email. You can also set different notifications for separate Forms.

  • Follow the video Screen-cast

Or follow the step by step Process

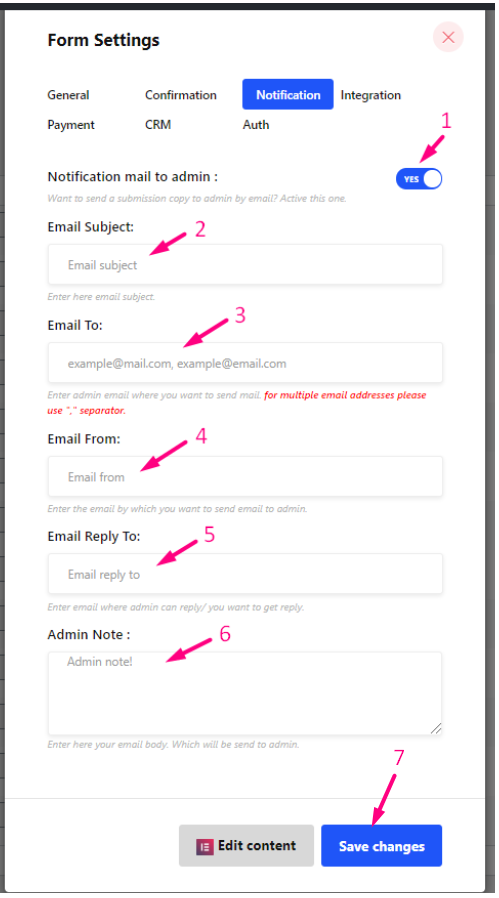
Step=>1: Navigate to Form Settings → Notifications

  1. Toggle the Notification mail to admin option: Notify admin after user submission is completed or any type of customer data is processed.
  2. Email Subject: Provide subject of the Email
  3. Email To: Enter admin email where you want to send mail. for multiple email addresses please use “,” separator.
  4. Email From: Enter the email by which you want to send email to admin.
  5. Email Reply To: Enter email where admin can reply or you want to get reply.
  6. Admin Note: Enter here your email body, which will send to admin.
  7. Save the changes
What are your Feelings
Share This Article :
Updated on July 19, 2020
Confirmation Auth
Table of Contents
  • Set Up Notification Email
    • How to Create Form
    • Form Setting
    • Notification Email
Copyright © 2021 Wpmet